Best Sugar Cookies Ever
These cookies are: easy to make, a nice white colour, cut cleanly with cutters and taste amazing. My family likes them even without icing.
1 cup butter
2/3 cup sugar
1 extra large egg
1 teaspoon vanilla
½ teaspoon salt
1 ½ cups sifted flour
Directions
1) Preheat oven to 350 F.
2) Cream butter and sugar together.
3) Beat in egg and add vanilla, salt, and flour.
4) Make 2 balls and place in plastic bags then chill for 2-3 hours.
5) Roll out the dough until it is ¼ inch thin. (You may have to let the dough warm up a little a room temperature.)
6) Bake on a cookie sheet lined with parchment paper for 8-10 minutes. Let cool completely before decorating.
Best Ever Sugar Cookie Recipe
Grandma Gilbert’s Sugar Cookies
This recipe is a family recipe from my Grandma Gilbert. This cookie have cream of tartar in them and are slightly fluffy. They taste great but do not cut as cleanly as the best ever cookie recipe.
¾ cup butter
½ cup white sugar
½ cup brown sugar
1 egg
1 teaspoon vanilla
2 cups flour
1 teaspoon soda
1 teaspoon cream of tartar
1/4 teaspoon salt
Directions
1) Cream butter and sugar then add egg and vanilla.
2) Add flour, soda and cream of tartar.
3) Refrigerate for one hour.
4) Roll dough out to ¼ inch thickness and cut with cookie cutters.
5) Bake for 9-10 minutes at 350F

Grandma Gilberts Delicious Sugar Cookies
ICING RECIPES
Each of the following recipe has a thin and thick version. You will need both to if you want to flood the centre of your sugar cookies with icing. The thick icing is to outline the cookies so the thinner icing can be placed in the middle and flow out.
Have fun!!
Home Made Thick Royal Icing with Lemon Juice
(Thick for Outlining) ( All Natural Ingredients)
Makes 2 ½ cups
6 Tablespoons Pasteurized Egg White (found in the dairy case)
4 cups icing sugar
1 tablespoon of strained lemon juice 1 teaspoon regular or clear vanilla (optional)
Directions
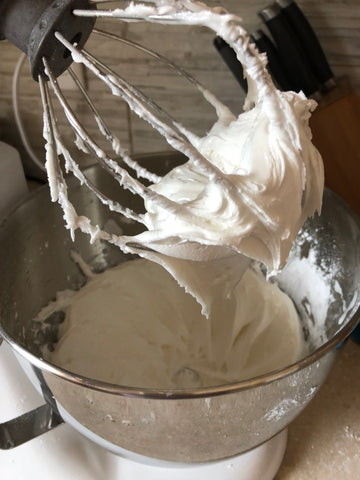
1) Place all of the ingredients in a medium bowl and with an electric mixer on low speed beat until blended.
2) Turn mixer to high speed and beat for 3-4 minutes until the icing is the consistency of a stiff meringue. Icing should thick enough to hold its shape.
Note: Always cover the bowl with a damp tea towel to prevent royal icing from getting hard.
Home Made Royal Icing with Lemon Juice
(Thin to flow in centre of cookies) (All Natural Ingredients)
Makes 2 ½ cups
6 Tablespoons Pasteurized Egg White (found in the dairy case)
3 cups icing sugar
1 tablespoon of strained lemon juice 2 teaspoons water 1 teaspoon regular or clear vanilla (optional)
Directions
1) Place all of the ingredients in a medium bowl and with an electric mixer on low speed beat until blended.
2) Turn mixer to high speed and beat for 2 minutes until the icing is the consistency of a stiff meringue. Icing should thick enough to hold its shape.
Note: Always cover the bowl with a damp tea towel to prevent royal icing from getting hard.
Note: This icing can go into a disposable bag without a tip. Then cut off the tip of the bag and fill your centres of your cookies.)
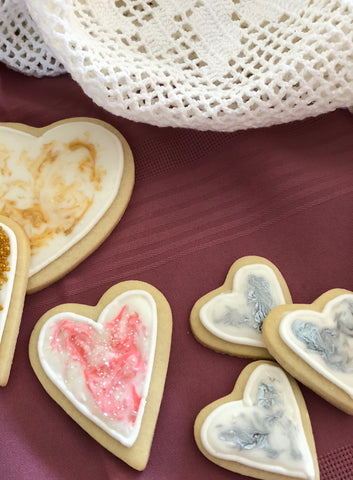
Sugar Cookie with icing made with lemon juice and pasteurized egg white
Home Made Royal Icing with Cream of Tartar
(Thick for Outlining)
Makes 2 ½ cups
6 Tablespoons Pasteurized Egg White (found in the dairy case)
4 cups icing sugar
½ teaspoon Cream of Tartar
Directions
1) Place all of the ingredients in a medium bowl and with an electric mixer on low speed beat until blended.
2) Turn mixer to high speed and beat for 3-4 minutes until the icing is the consistency of a stiff meringue. Icing should thick enough to hold its shape.
Note: Always cover the bowl with a damp tea towel to prevent royal icing from getting hard.
Home Made Royal Icing Cream of Tartar
(Thin to flow in center of cookies)
Makes 2 ½ cups
6 Tablespoons Pasteurized Egg White (found in the dairy case)
3 cups icing sugar
½ teaspoon Cream of Tartar 2 tablespoons water
Directions
1) Place all of the ingredients in a medium bowl and with an electric mixer on low speed beat until blended.
2) Turn mixer to high speed and beat for 2 minutes until the icing is the consistency of a stiff meringue. Icing should thick enough to hold its shape.
Note: This icing can go into a disposable bag without a tip. Then cut off the tip of the bag and fill your centers of your cookies.) Always cover the bowl with a damp tea towel to prevent royal icing from getting hard.
Easy & Delicious Buttercream Icing
for Sugar Cookies (Great to use with Kids)
This is a wonderful tasting icing but will not get as hard as the royal icings.
This is the only recipe that does not have separate thick and thin icings.
3 cups icing sugar
4 tablespoons butter
4 tablespoons milk
2 teaspoons regular or clear vanilla
1 teaspoon lemon juice
Directions
1) Combine all ingredients in a medium bowl and beat until smooth.
2) Spilt the icing in half. Use one half of the icing to make the borders around the cookie to hold the icing.
3) With the other half, add 1 more tablespoon of milk to one half of the icing and mix until smooth. This makes the icing that flows (for the middle of the cookie.)
Wilton’s Royal Icing made with Meringue Powder
The recipe on the container suggests taking 1 cup of the thick icing and adding 1 teaspoon of water but typically you need more icing than what it makes so why not make a thin batch and a thick batch and have plenty of icing.
Thick Icing
3 Tablespoons Meringue Powder
4 cups Icing sugar
5 tablespoons water
Directions
1) Beat together all the ingredients in medium bowl for 7-10 minutes until icing peaks form. (If you are using a hand mixer it will take 10-12 minutes)
Royal Icing made with Meringue Powder
Thin Icing
3 Tablespoons Meringue Powder
4 cups Icing sugar
9 tablespoons water
1 teaspoon regular or clear vanilla
Directions
1) Beat together all the ingredients in medium bowl for 7-10 minutes until icing peaks form. (If you are using a hand mixer it will take 10-12 minutes)
Note: Cover with a damp tea towel if you are going use the icing for more than 2 minutes. If you do not a crust will form.
To decorate try any of our amazing selection of sprinkles.
Note: Wilton no longer sells Color Flow. It contains sodium laureth sulfate which is a surfactant used in cleaning products. Not good to eat and if you ever read the package it said it was for decorations.
]]>


 Notes: If the icing is sticky add more icing sugar. This recipe makes very nice rolled fondant that looks professional. If you want to use fondant after a few days and it goes hard, it can be softened by microwaving it for 30 seconds. More recipes like this can be found in the icing cookbook "Icing Only" from Amazon.ca


